I hope these tutorials are easy for you to follow, i have tried to make them as concise as i can but if you need some advice you can drop me a line.
An
essential part of single player mapping, waypoint navgoals can seriously
enhance your levels, playability.
For
this tutorial you will need to have GTK radiant, at the moment version
1.5 is available but i still use 1.4.you will need to know your way around
the entities menu ,"n" key, and have some experience using Behave_Ed
which is used to generate scripts, but in saying that the script i am
using here is only one of many similar scripts in jedi academy, you may
find one that suits your needs and you wont have to make your own , the
reason i use the kejim script is that i had made 3 levels for jedi outcast
and i converted them over to academy, but i didnt want to go and manually
change all of the script settings for each npc so it was easier for me
to create the kejim script so my npcs would still do the same actions.
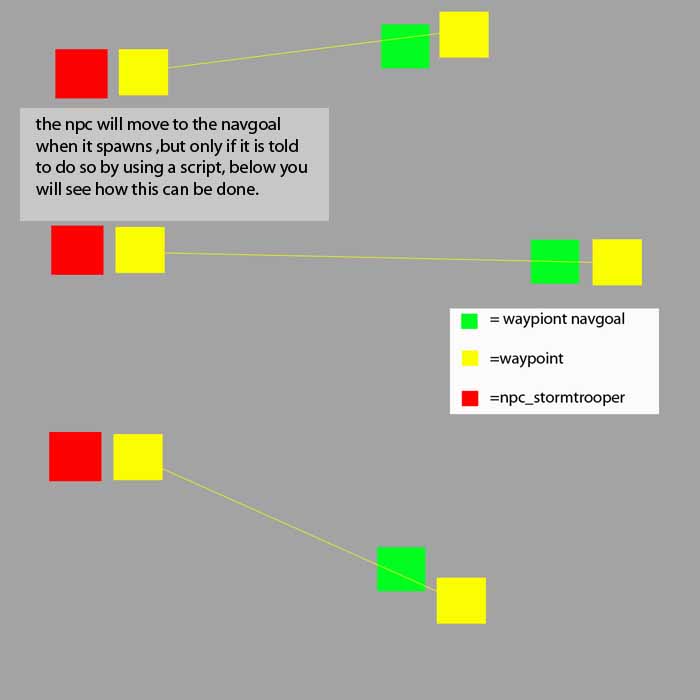
T his
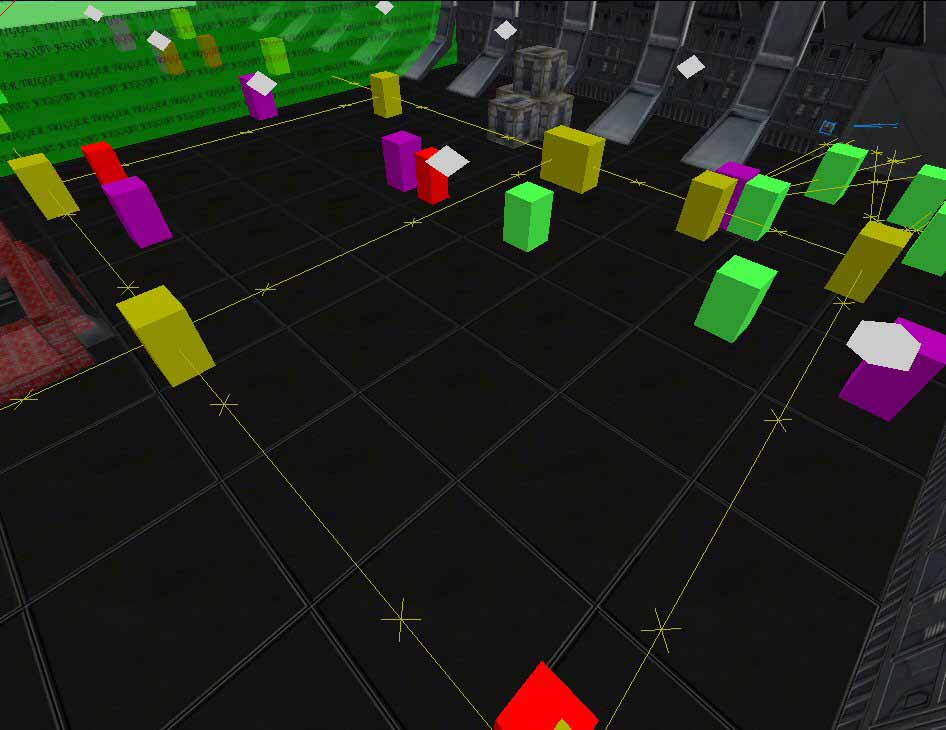
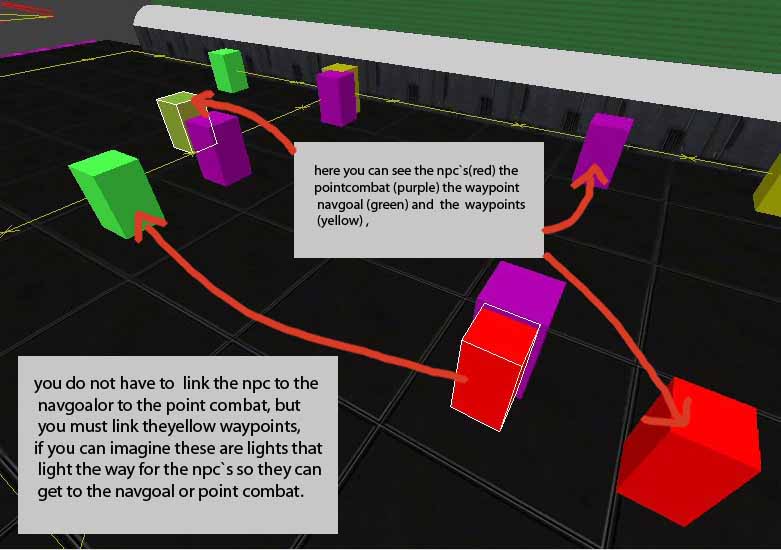
is a perspective view of both the npc`s and the waypoint navgoals,also there
are some waypoints in picture.
it is best that you know basic npc spawning and routing,
Ok, now,
the idea behind using waypoint navgoals, is to enable the npc`s to "behave"
more "life like" in game,instead of an npc just moving out to shoot
you, we get it to run up onto a platform to shoot down onto you, or run behind
you, or run and hit an alarm which activates turrets, you get the idea.
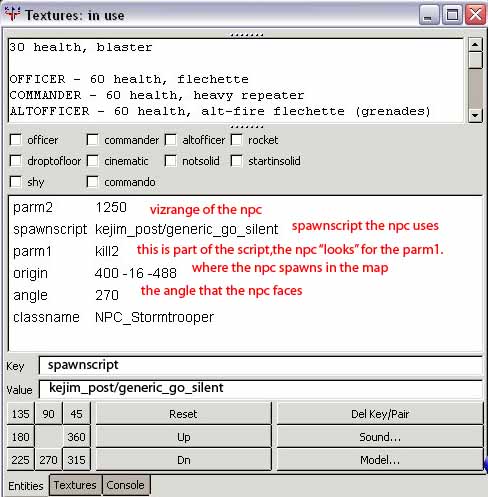
Left you see the entities menu in GTK radiant(version 1.4),you can see i`ve given
the trooper a spawnscript,this is the key to making our npc more "life
like".
the spawnscript i have used is one that i used for my jedi outcast levels ,in
fact it isnt used in jedi academy so i rewrote it for the game, it is as follows,in the table below.
//Generated by BehavEd
rem ( "comment" );
set ( /*@SET_TYPES*/ "SET_NO_COMBAT_TALK", /*@BOOL_TYPES*/ "true"
);
//$"patrolRunNoChase"@5
set ( /*!*/ "SET_BEHAVIOR_STATE", /*!*/ "BS_DEFAULT"
);
set ( /*!*/ "SET_WALKING", /*!*/ "false" );
set ( /*!*/ "SET_RUNNING", /*!*/ "true" );
set ( /*!*/ "SET_LOOK_FOR_ENEMIES", /*!*/ "true" );
set ( /*!*/ "SET_CHASE_ENEMIES", /*!*/ "false" );
task ( "go1" )
{
set ( /*@SET_TYPES*/ "SET_NAVGOAL", $get( STRING, "SET_PARM1")$
);
}
task ( "go2" )
{
set ( /*@SET_TYPES*/ "SET_NAVGOAL", $get( STRING, "SET_PARM2")$
);
}
wait ( $get( FLOAT, "SET_PARM3")$ );
dowait ( "go1" );
//(BHVDREM) set ( /*@SET_TYPES*/ "SET_ENEMY", "kyle"
);
dowait ( "go2" );
set ( /*@SET_TYPES*/ "SET_NO_COMBAT_TALK", /*@BOOL_TYPES*/ "false"
);
//$"default"@6
set ( /*!*/ "SET_BEHAVIOR_STATE", /*!*/ "BS_DEFAULT"
);
set ( /*!*/ "SET_CHASE_ENEMIES", /*!*/ "true" );
set ( /*!*/ "SET_LOOK_FOR_ENEMIES", /*!*/ "true" );
set ( /*!*/ "SET_IGNOREALERTS", /*!*/ "false" );
set ( /*!*/ "SET_WALKING", /*!*/ "false" );
Click on the image above to see a rough layout of waypoint and navgoals in relation to where the NPC spawns.
Dont panic, its not too dificult to understand, but all we need to know is it works, look at the text for a minute and see the "SET NAVGOAL" part, on the next line it says "SET PARM1", this is what we need to "tell" the NPC where to go in the level.
CHECK OUT PART 2 OF THIS TUT TO SEE HOW TO GET THE NPC TO DO WHAT YOU WANT!.