- MAP MODELS TEXTURES LEVELS PHOTOS ARTWORK MAP MODELS TEXTURES LEVELS ARTWORK MAP MODELS TEXTURES LEVELS   - MAP MODELS TEXTURES LEVELS
TUTORIALS  
-
-
HOME
-
-
MODELS
-
TEXTURES
-
LEVELS
-
ARTWORK
-
SHADERS
-
TUTORIAL
-
FILES
-
-
-
-
-
TUTORIALS
-
-
-
-
-
-
HOME
-
-
-
 
-
-
- - - - -
-
-
-
-
-
-
-
-
-
-
-
-
-
 
TEXTURING AND EXPORTING WITH 3DSMAX

TEXTURING AND EXPORTING A MODEL FROM 3DS MAX TO GTK

PART 1

I feel i should let you know about the type of model that can be used for Jedi Academy.

MD3
Firstly there is the .md3 this format has evolved along with game engines, this is the most popular format for Quake 3 engine based games.

ASE
There is also .ase format, this a format that lots of 3D apps can export to without the need for a plugin (handy when you dont know which plugin to use).

There is one huge point in favour of this format, you can make HUGE models where as .md3 is limited to 512 point form the xyz origin, so .ase are great for large buildings and structures.

The down side of this format is the size in KB-MB generally .ase files are much bigger in KB size compared to the same models in .md3 format.

It looks like .ase files dont support shaders in Jedi Academy, yes, i was pretty upset about that too.

IMP_CONTROLS

This is a tutorial to show you how to skin a model in 3ds max and export it to GTK Radiant.

The game this model is for is Jedi Academy but you could use these instructions for models used in Doom3 Quake 4 and others.


MATERIAL EDITOR IN MAX

In 3ds max,hit the "M" key to bring up the materials editor,you will see some spheres at the top, these are the representations of the materials that you use, at the moment they are all grey,which means they have no material assigned.


Look below the spheres to the rollout called"blinn basic parameters", look on the left side of this rollout and you will see a grey button next to the word diffuse (see image)click this and a new window will open up, click the "bitmap" from the list and browse to where your texture is placed.For the sake of this exercise the location of the texture is in "models/map_objects/dstar/imp_controls.jpg", this is where the model is too,and the "models"folder is in your "base" dir.

After you have selected the texture,the sphere will be covered with it,now in the space next to the "bitmap" button you must enter the FULL directory name plus the name of the texture e.g."models/map_objects/dstar/imp_controls.jpg", the reason you do this is so that when someone else has your model on his/her hard drive the texture will be found,(provided of course that they have it in the right folder).

MATERIAL EDITOR PLUS DIRECTORY OF IMAGE

The images on this page open into large images showing you exactly what to do, but of course things might not work out the first time you try, mine didn't, but don't be discouraged each time you do this is a step closer to getting it done.
Ok now, there is a little arrow above the "bitmap"button, which is return to parent, click it, now insert the full name of the texture including the folders, just like you did before,but you will see the "bitmap" button has become "standard". ADDING THE FULL DIRECTORY NAME OF THE TEXTURE YOU ARE APPLYING PLUS THE EXTENSION IN THIS CASE .JPEG

You 
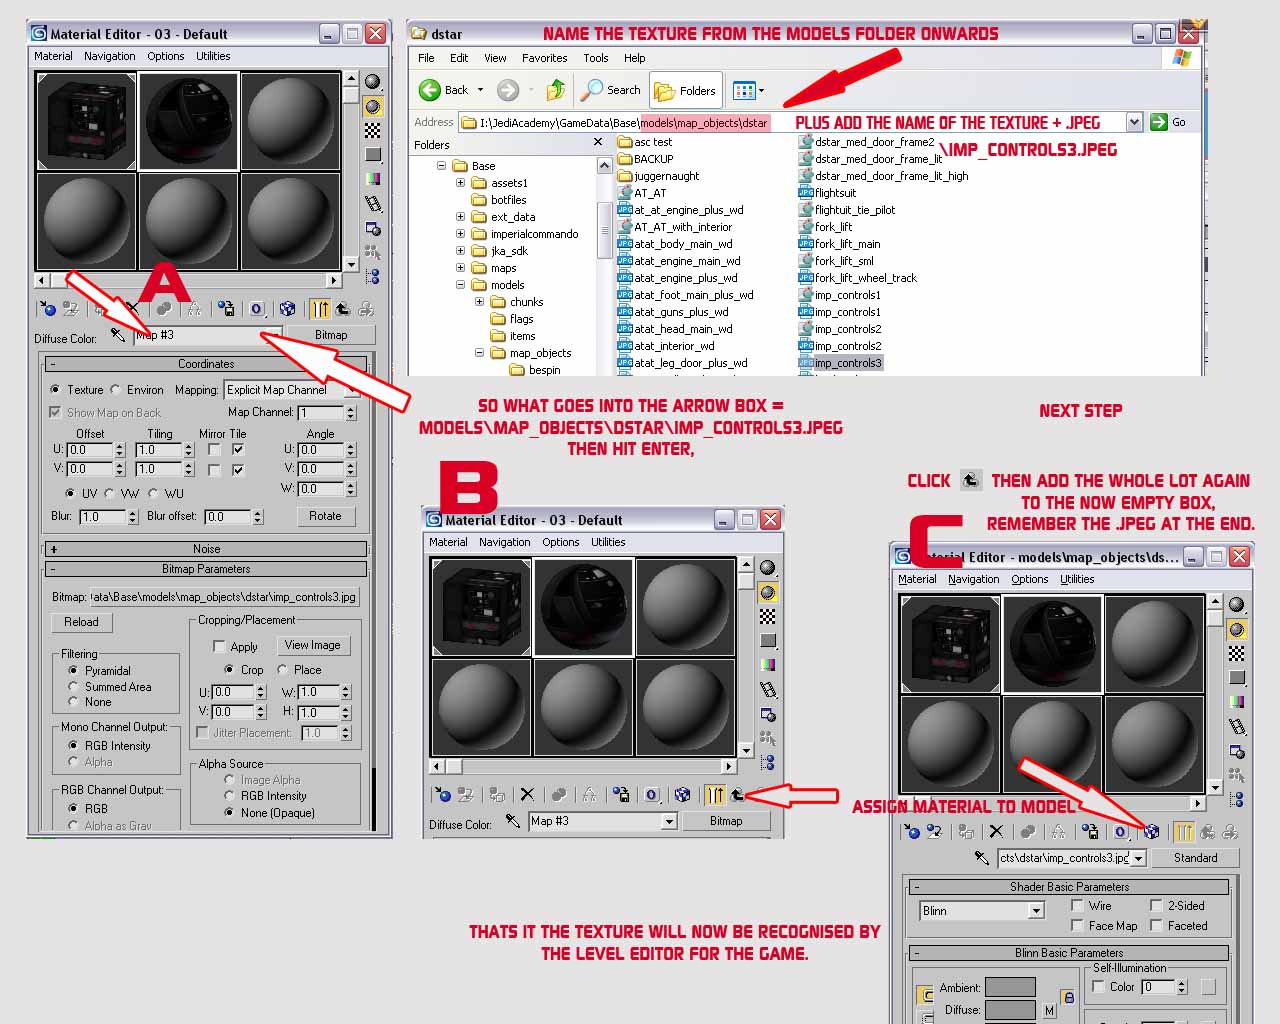
can now click the "assign material to object" button,its just above the name of the texture, 3rd from the right.you will see the model changes color,now click the "show in veiwport" button,(checkered cube button above "standard" button.
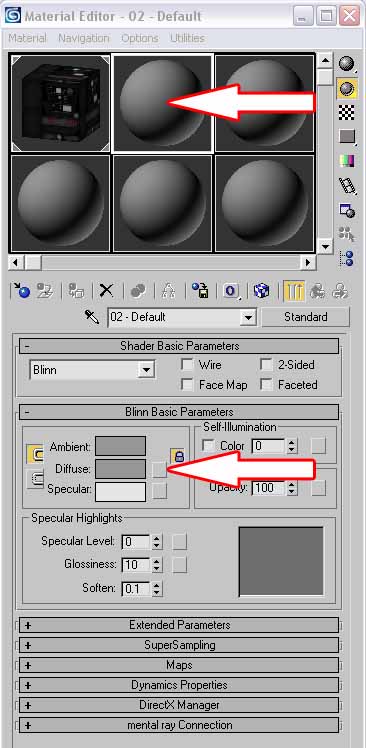
Now you can see the texture in the veiwport,and you have named your texture,look below to the "shader basic parameters", you will see a drop down arrow click it and select "metal".That's it the model is now textured properly. 
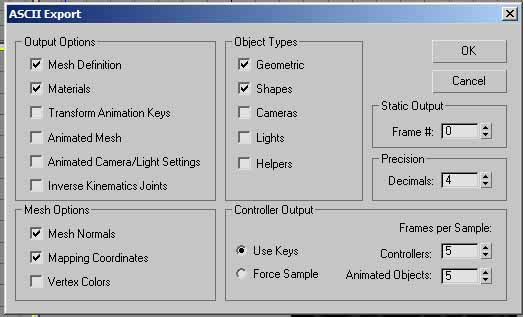
next we will export as a .ase file.

I will also add how to export to a .md3 file which is the best format to use if you want your models to use shaders.

Here you can see the options you need to select to correctly export an .ase model.

when you export the model you can just export it to your meshes folder and copy it from there to its directory in your base\models--- folder, just make sure its in the same folder as the textures, it makes things allot simpler to track down problems.

ASE EXPORT OPTIONS IN MAX

TUTORIAL
HOME
  HOME
-
-
-
-
PART2
-
TUTORIAL 2
-
-
-
LINKS
-
-
-
-
-
-
-
WORKS
IN
PROGRESS
-
-
-
-
-
-
HOME
-
-
-
 
-
-
- - - - -
-
-
-
-
-
-
-
-
-
-
-
-
-